Recently I was asked to run an Inkscape/GIMP workshop for a local makerspace. Local makers were interested in using free tools available to make cuts and designs on the makerspace's laser cutters - glowforges. I want this entry to show what we did during the workshop and be a reminder for those who attended and maybe a tutorial for those who are reading this for the first time. Let's start with Inkscape.
 |
| Figure 1: Reference shadowbox to practice many skills. |
New versions of Inkscape ask you to set some defaults to your liking. They can all be changed in the editor preferences located at Edit/Preferences top menubar. You likely already have a design idea in mind and some materials you want to use. For the purposes of the workshop I settled on one of the designs I found online show in Figure 1. The design image pointed to an Etsy store suggesting the store provided files needed to cut the box yourself, however the page was gone from Etsy by the time I tried to access it. It is also worth noting that most layers are simply cut, but the moon in the background is also etched - it has the moon image on it, not just a cut circle.In this regard the reference box presents a good challenge to dive further into the differences between cutting and etching as well as the differences in image formats.
The makerspace also provided a 6x12" board as a target material. Since the box has 4 layers I decided to concentrate on layering the images and ignore the rounded box (rounded cuts used in this box are called Living Hinges). Now that we have a design reference and material we're ready to start. Shadow boxes utilize layers of cut material so instead of making one board, we are making four. You can potentially create a 6x12" image in Inkscape, but then you won't be able to quite tell relative position of items on different layers. So instead we will create a 3x6" image, and at the end separate it to 4 tiles.
Document Properties
 |
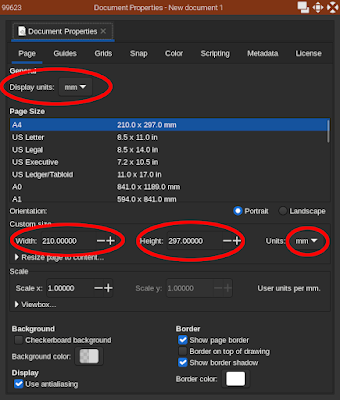
| Figure 2: Setting document size and units |
 |
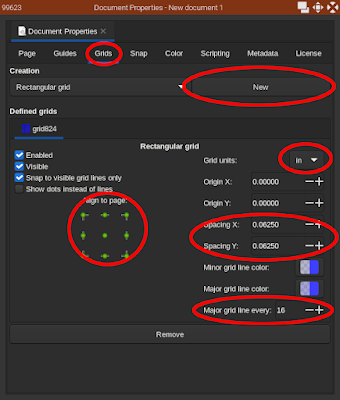
| Figure 3: Creating a new grid |
First thing first is to tell Inkscape what document are we creating. The document properties dialog can be found by following File/Document Properties... on the top menubar. Change the Display Units to the unit of your preference. Change the custom size values to reflect your board size - 3x6". This dialogue box has multiple tabs too - we will work with Grid tab next. It's worth noting that if you change Background color here as well as the Border color - the changes will only affect the appearance of Inkscape and are not reflective of anything in the actual image. Fields to change are highlighted in Figure 2. If you are working in Inkscape to create art you probably will want black or white background but we have a lot of freedom in here. I like to keep my background dark or to set it to a shade of wood I'm dealing with.
Back to the document properties window, find the Grid tab and click it. There you can create a New grid - Inkscape allows you to define multiple grids here. In the attached image I already have all of the values filled in. Once again changing grid units to the ones relevant to you. We will be working with inches, so that's what I set mine to be. Now it's time to set the spacing of the grid lines. Please not that Inkscape sets spacing of the minor grid lines and then you have an option to specify how many minor grid lines should a major grid line be drawn. So if you set your spacing to 1/16 and major grid line to 16, that means a major grid line will be drawn for every 1 unit. In our case that's 1 inch. Again, fields to change are highlighted in Figure 3. Pay attention to the grid alignment selection mechanism located to the bottom-left from the center of Figure 3. Our document is composed of whole parts of a unit (3x6"), the grid spaced at 1/16 of an inch, with a major grid line placed every 16 minor grid lines. That means there will be a major grid line going through each corner of the document (Figure 4) no-matter the alignment setting in Figure 3.
| Figure 4: Major grid lines |
If, however, you set to be grid spacing to not divide an inch into whole parts, or if you set major grid lines to be further apart, the grid will be out-of alignment and alignment setting on Figure 3 lets you choose a corner where the grid will align to.
Rectangle tool
| Figure 5: Rectangle tool |
Finally, we are ready to start working on our box. First thing first - notice the box has rounded edges covering the outside of the scene. Let's add a rounded rectangle to do the same! All of the Inkscape's drawing tools are located on the left menu panel. Select the one that looks like a rectangle (Figure 5). We want to have snapping on to allow us freehand drawing while also keeping all of the lines straight. Snaping tool moves around version-to-version but in general looks like a magnet icon in the top-right corner of the application. Another option is to press Shift+5 (otherwise, type % sign) to toggle snapping on/off. For now we want snapping on to draw our rounded rectangle and we want to drag it from the top-left corner of the document to the bottom-right corner. The newly drawn rectangle will appear with 3 control nodes - two square ones in top-left and bottom-right corner - those set the dimensions of the rectangle. And one circle-node in the top-right corner - that's a rounded corner control. Drag it to round the corners of the drawn rectangle.
 |
| Figure 6: Rounded rect |
Select tool
On the left toolbar, above where you found the rounded rectangle tool, the top most item is the seclection tool. As the name suggests it lets you select and change varouis objects. If you select the rectangle we just created you'll be able to edit its location and size using the tool controls bar that changes dynamically depending on the selected tool. In the tool controls bar you will find both the position and size of the created rectangle. For me it says X: -0.012 Y: -0.012 W: 6.024 H:3.024. Your size might not be the same but it's likely not a whole number either. So what did we snap to? It turns out the snapping tool takes the width of the outline into account and snaps such that the snapping point (grid line in this case) goes through the middle of the outline of the shape.
Fill, Outline, Vector, and Raster
If you've dealt with images previously you'll notice that zooming in on the Inkscape graphics does not introduce the common pixelated view you are used to. That's because Inkscape does not deal with images on a pixel level. Instead it defines everything in terms of mathematical constructs that it is able to operate on. In photos, everything is a grid of pixels (colored dots) and the photo is stored as such. There is no representation of any hierarchy or properties of objects. If you take a picture of a tree, your camera doesn't know that it's a tree, it doesn't know where the tree starts and end - all it knows is that there are brown pixels here and there are green pixels here, and if the background is a sky - there are blue pixels in between the green ones. This approach is great for being able to represent any sort of image we want, but it's tough to allow editing it - the computer doesn't have a concept of a tree, so you can't resize "just" the tree, or "just" its leaves, for example.
Inkscape takes a different approach - you define your scene in terms of primitives - rectangles, circles, beizer curves - this is how a leaf looks, this is how a tree looks. You define a relationship between these primitives - leaves are attached to branches, branches are attached to a trunk. And this lets the computer easily process new complex changes you may potentially do to the scene like making the leaves on your tree bigger, without changing anything else. This is the difference between raster and vector graphics - raster graphics are a collection if pixels (color dots), vector graphics are a collection of vectors (coordinates, sizes, properties) of variaous primitives.
All vector primitives can be defined as curves (paths in SVG jargon). Shapes are just closed curves. A curve can have a color and a thickness. How a curve is drawn is dictated by its Stroke properties. In addition, if a curve is closed you can Fill it with color or a texture. Going back to our rectangle - it's a closed curve with outline being the curve's stroke, and the inside of the rect is the fill of that curve.
Laser Kerf and Stroke width
Wikipedia has a good description for why it's happening, but in the essense - there's a focusing lense on your laser cutter that's aiming at a certain distance from the laser tip. At the focal point the circle that accepts the light from the laser is the smallest. For Glowforge that's 0.2mm. However, the further away you go from the focal distance the wider that circle becomes - for the Glowforge that's 0.6mm. This value changes each time you change the height between the laser and your target material, so the only way to get the actual value is to measure - Here is a good example for how to measure your laser kerf, but for the purposes of this writeup we'll use the worst case value - 0.6mm. Back in Inkscape we can right click on our rectangle and choose Fill and Stroke... Or go to the top menubar and choose Object/Fill and Stroke... In the newly opened dialog we can select Stroke style tab and set the width of our stroke - 0.6mm. We also want to set Join and Cap to rounded. The order should use anything where stroke is done after fill. So options Fill, Stroke, Markers, Fill, Markers, Stroke, or Markers, Fill, Stroke will do. I like the first one. Back to snapping the rectangle - remember that the snapping poing is the midpoint of the stroke line - this might compilcate your exact sizing.


No comments:
Post a Comment